Free Printable Charts

Violin Finger Charts

7 Free Downloadable Fingering Sheets

Printable fingerboard diagrams and staff notation for beginners through advanced players. Standard G–D–A–E tuning.

Fingerboard
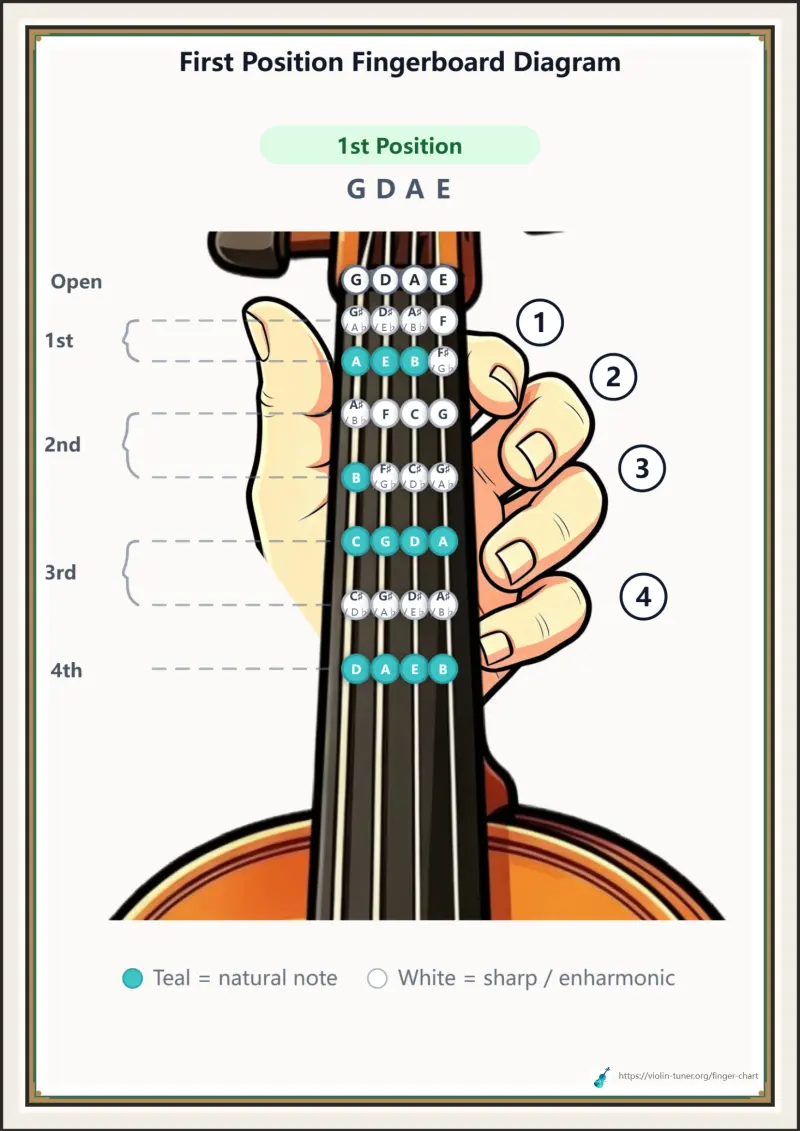
Open4thGDAEGDAEG♯/ A♭D♯/ E♭A♯/ B♭FAEBF♯/ G♭A♯/ B♭FCGBF♯/ G♭C♯/ D♭G♯/ A♭CGDAC♯/ D♭G♯/ A♭D♯/ E♭A♯/ B♭DAEB1234
First Position Fingerboard Diagram
Neck diagram with fingers 1–4, note names, and enharmonics. For absolute beginners learning 1st position.
Click to enlarge
Staff

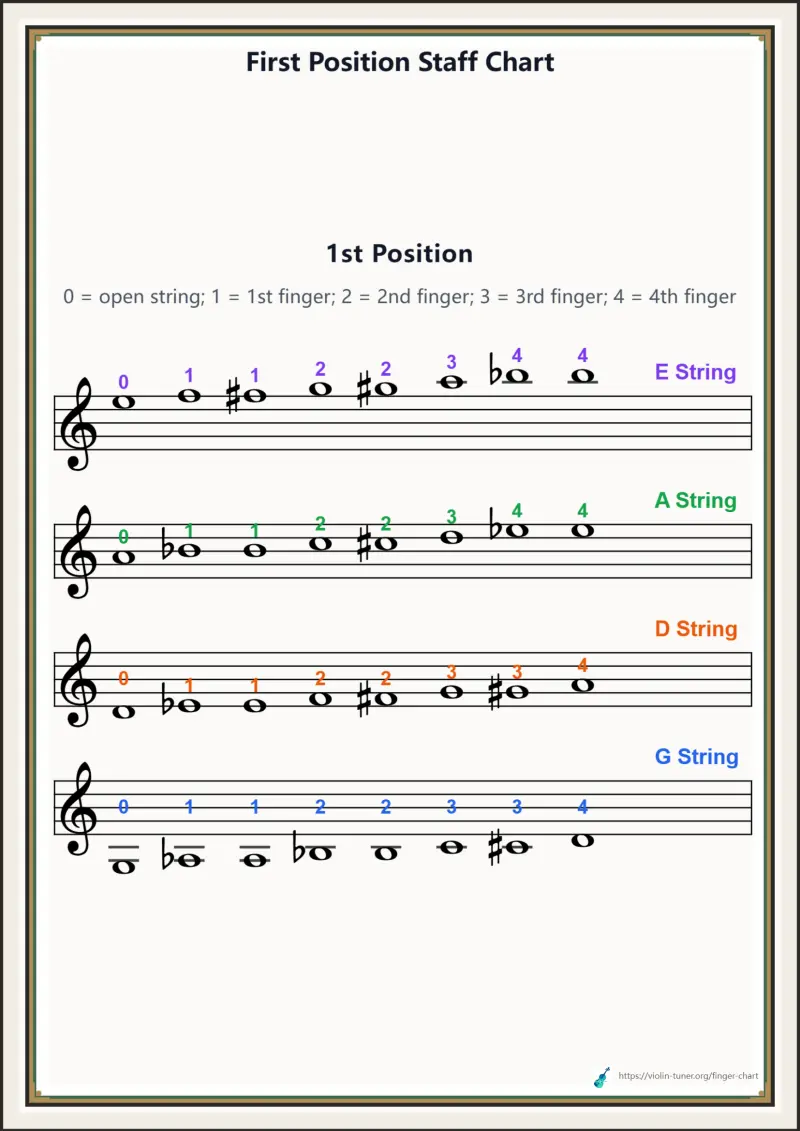
1st Position

0 = open string; 1 = 1st finger; 2 = 2nd finger; 3 = 3rd finger; 4 = 4th finger

First Position Staff Chart
Treble staff for G, D, A, E strings with fingering numbers above each note. Read from sheet music.
Click to enlarge
Fingerboard
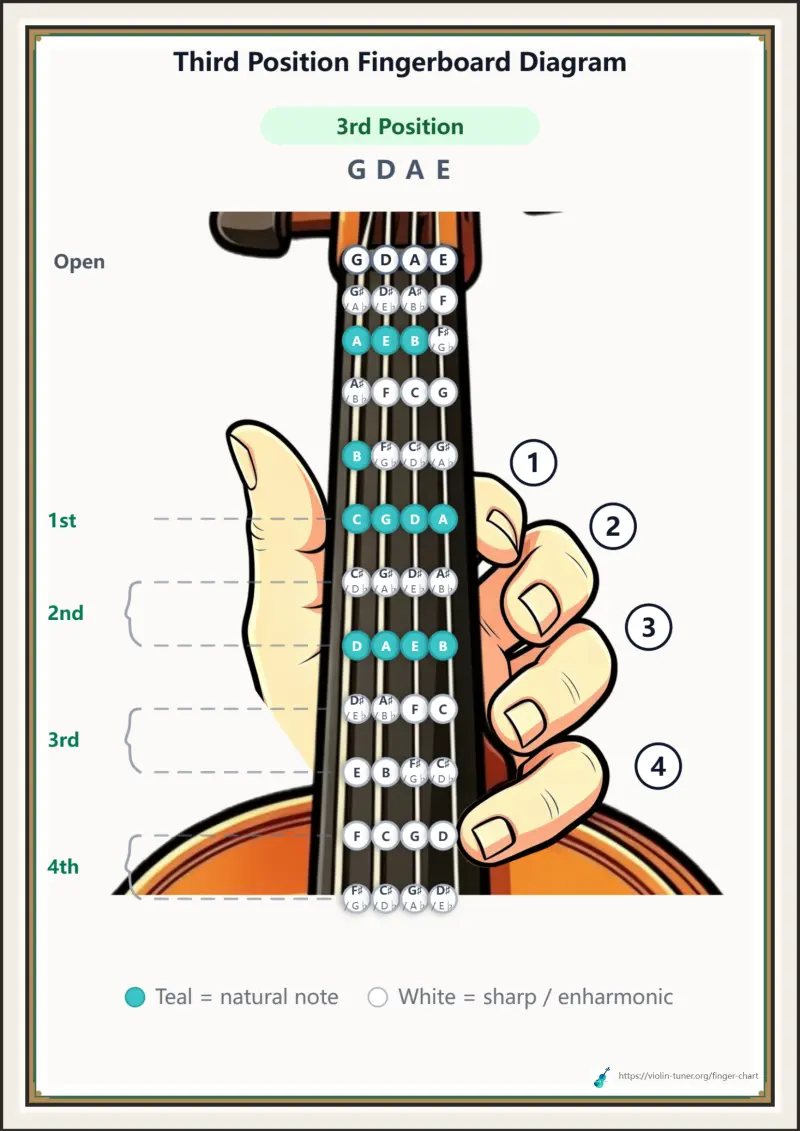
OpenGDAEGDAEG♯/ A♭D♯/ E♭A♯/ B♭FAEBF♯/ G♭A♯/ B♭FCGBF♯/ G♭C♯/ D♭G♯/ A♭CGDAC♯/ D♭G♯/ A♭D♯/ E♭A♯/ B♭DAEBD♯/ E♭A♯/ B♭FCEBF♯/ G♭C♯/ D♭FCGDF♯/ G♭C♯/ D♭G♯/ A♭D♯/ E♭1234
Third Position Fingerboard Diagram
Complete 3rd position neck diagram for intermediate players, separate from 1st position.
Click to enlarge
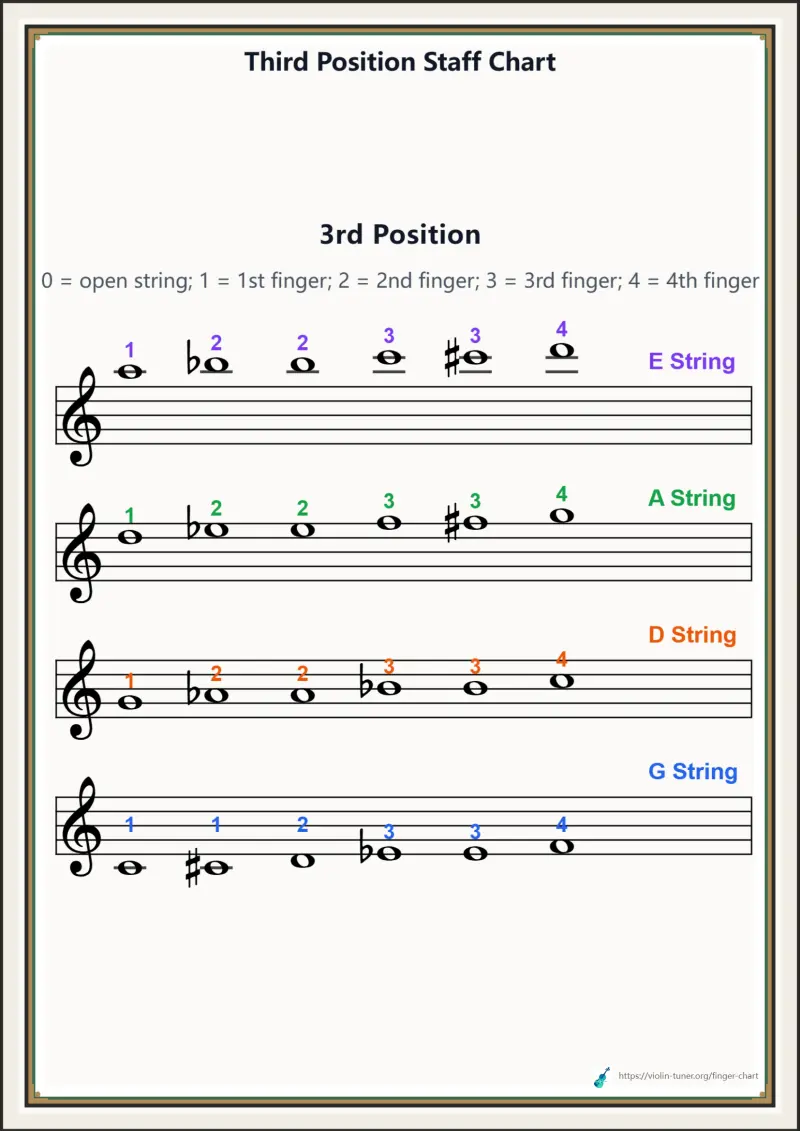
Staff

3rd Position

0 = open string; 1 = 1st finger; 2 = 2nd finger; 3 = 3rd finger; 4 = 4th finger

Third Position Staff Chart
Staff notation dedicated to 3rd position fingering on all four strings.
Click to enlarge
Multi-Position
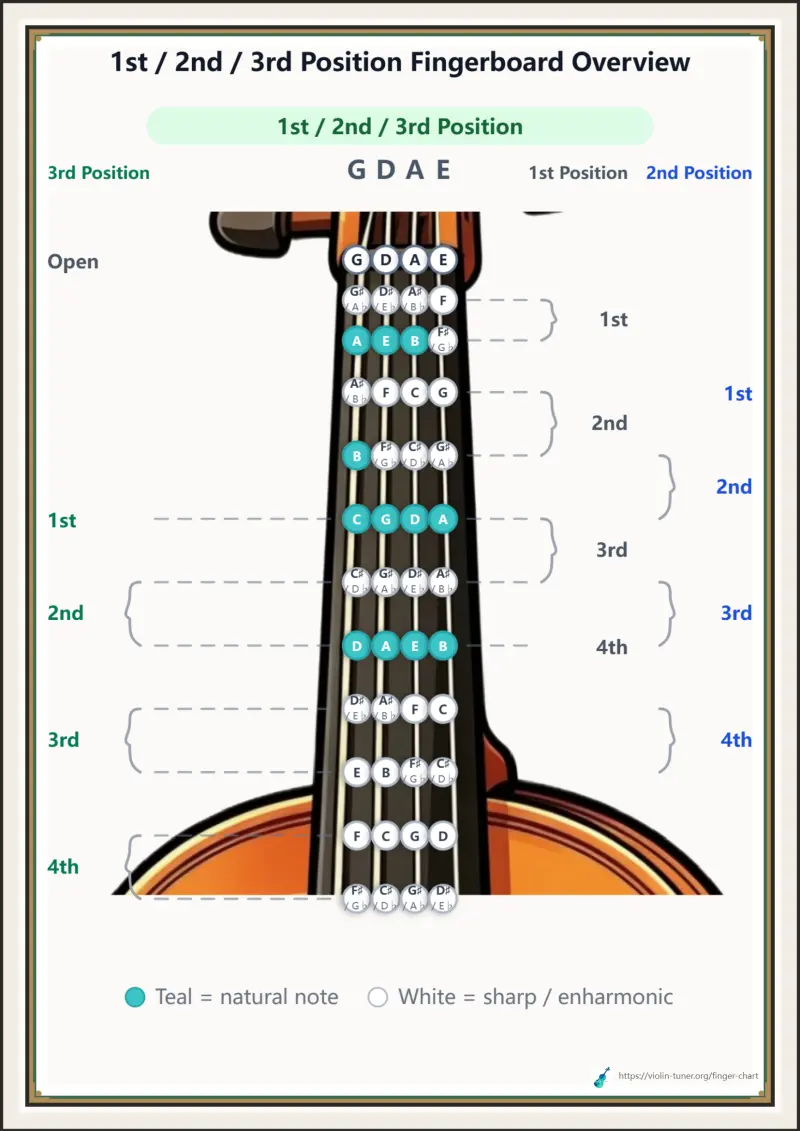
GDAEGDAEG♯/ A♭D♯/ E♭A♯/ B♭FAEBF♯/ G♭A♯/ B♭FCGBF♯/ G♭C♯/ D♭G♯/ A♭CGDAC♯/ D♭G♯/ A♭D♯/ E♭A♯/ B♭DAEBD♯/ E♭A♯/ B♭FCEBF♯/ G♭C♯/ D♭FCGDF♯/ G♭C♯/ D♭G♯/ A♭D♯/ E♭
1st / 2nd / 3rd Position Fingerboard Overview
One neck diagram comparing positions: 3rd on the left, 1st and 2nd on the right.
Click to enlarge
Combined

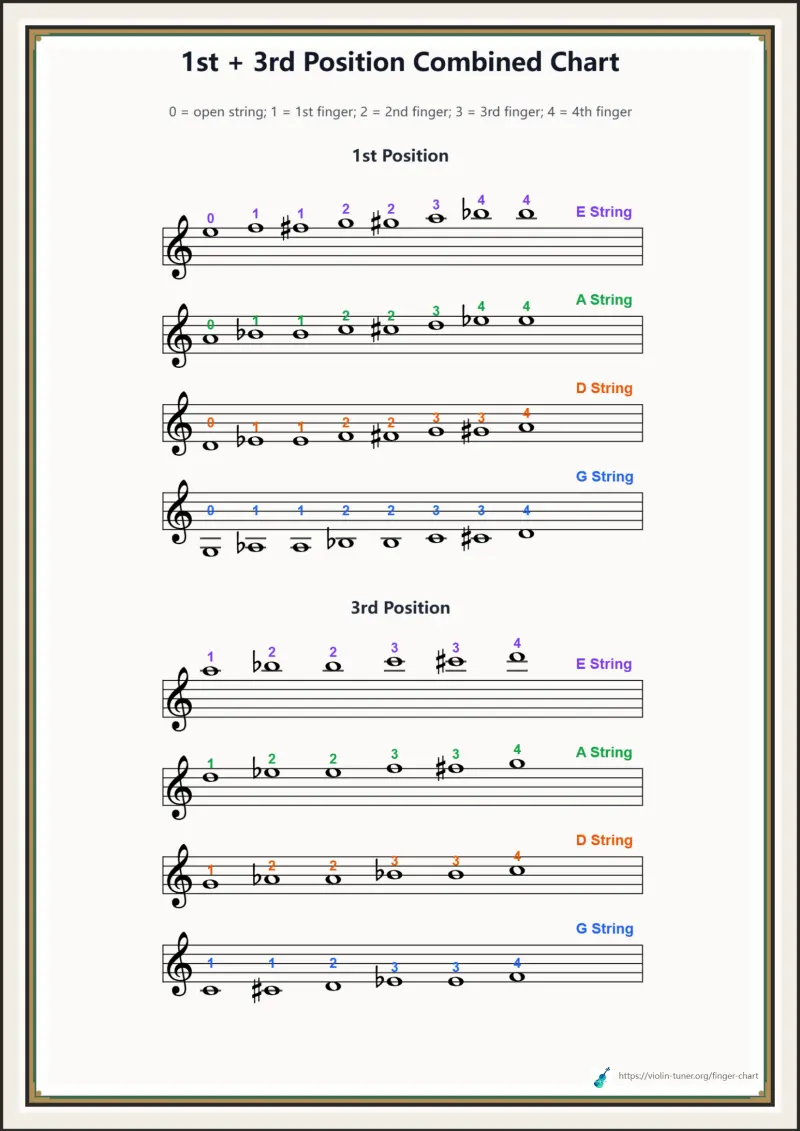
0 = open string; 1 = 1st finger; 2 = 2nd finger; 3 = 3rd finger; 4 = 4th finger

1st Position

3rd Position

1st + 3rd Position Combined Chart
Both 1st and 3rd position staff charts on one page — covers most self-taught players.
Click to enlarge
Tape Guide
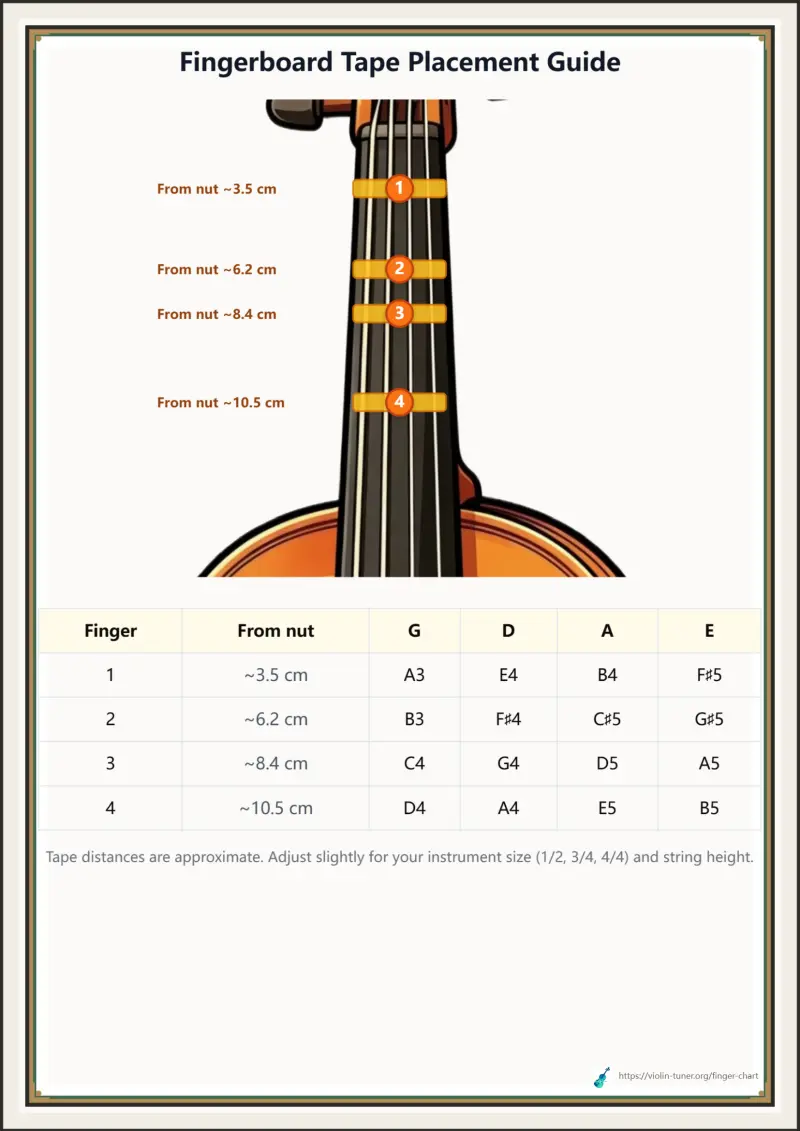
1234
FingerFrom nutGDAE
1~3.5 cmA3E4B4F♯5
2~6.2 cmB3F♯4C♯5G♯5
3~8.4 cmC4G4D5A5
4~10.5 cmD4A4E5B5
Fingerboard Tape Placement Guide
Where to place fingerboard tapes in 1st position, with approximate distances from the nut.
Click to enlarge

What each of the seven sheets is for, how to read it, and when to use it in practice. Learn the purpose first, then open a chart above to download or print.

01 / 7

First Position Fingerboard Diagram

This is the core beginner sheet: a player’s-eye view of the neck with G–D–A–E running vertically and note names marked in first position.

Teal markers are usually natural notes; white markers often show sharps/flats (enharmonic spellings). Finger numbers 1–4 group the hand shapes along the neck.

Use it to match what you see on the instrument before you rely on sheet music—build spatial memory of open strings and first-finger landmarks.
First Position Fingerboard Diagram

02 / 7

First Position Staff Chart

Once you read notation, you need “which finger for this printed note?” This chart groups notes by string and prints 0 (open) and 1–4 above the staff.

Practice tip: mark fingerings in a simple piece, then cross-check against this page.

It teaches staff-to-finger mapping, not the visual layout of the neck.

First Position Staff Chart

03 / 7

Third Position Fingerboard Diagram

Third position is a new “home” after the whole hand shifts up the neck. This diagram isolates that map so first-position names do not clutter the same view.

Key idea: on one string, first finger in third position sits near where third finger sat in first position, and the note names move higher.

Use it when shifting starts—find the new placement on the fingerboard, then refine intonation.

Third Position Fingerboard Diagram

04 / 7

Third Position Staff Chart

After you shift, scores still need fingering numbers. This staff sheet covers the usual third-position range with the same 0 / 1–4 meaning in a higher-position context.

When a study or piece asks for third position, check “which finger here?” on this page.

Pair it with the third-position fingerboard: staff for numbers, neck diagram for location.

Third Position Staff Chart

05 / 7

1st / 2nd / 3rd Position Fingerboard Overview

One overview compares first, second, and third position so you see that rising positions mean the hand moves toward the bridge.

It also helps you notice how finger spacing tightens higher up the neck.

Best once first position is secure and you are introducing second/third—use it for relationships, not as your only daily fingering lookup.

1st / 2nd / 3rd Position Fingerboard Overview

06 / 7

1st + 3rd Position Combined Chart

First- and third-position staff charts share one page—the two staff views self-taught players use most often, without flipping sheets.

When marking a score, decide whether a phrase stays in first position or moves to third, then look it up on the matching half.

For neck geometry, keep using the dedicated fingerboard diagrams.

1st + 3rd Position Combined Chart

07 / 7

Fingerboard Tape Placement Guide

Many beginners place colored tape as a tactile guide. This sheet shows approximate tape distances from the nut for a full-size (4/4) violin in first position.

Treat distances as starting points—fractional sizes and different string heights need small adjustments. Tape helps habits; ears and a teacher still own intonation.

Useful when a parent is setting up a student instrument or you are checking tape placement yourself.

Fingerboard Tape Placement Guide
Printable Reference Sheets

Violin Finger Charts You Can Actually UseFingerboard diagrams, staff notation, and tape placement — ready to download

Learning where your fingers land on each string is one of the first real hurdles every violinist hits. A clear violin finger chart takes the guesswork out of that — showing note names on the neck, fingering numbers on the staff, or both side by side. Here you will find seven printable sheets covering first and third position, a multi-position neck overview, combined staff notation, and a tape placement guide for full-size instruments. Each chart uses standard G–D–A–E tuning. Open any chart to preview it at full size, then download a free PDF or PNG image. No account, no paywall — just reference material you can keep on your music stand or hand to a student.

Preview before you download
Free PDF & PNG export
7 charts, no sign-up
7
Printable charts
1st
Position
3rd
Position
G–D–A–E
Standard tuning

First Position Fingerboard Diagram

A neck view with all four strings, finger numbers 1 through 4, and note names including sharps and flats. If you are just starting out, this is the chart you will reach for most often — it maps the notes you play in first position directly onto the fingerboard you see in front of you.

Staff Notation with Fingering Numbers

Some players think better on the treble staff than on a neck diagram. Our violin notes chart shows G, D, A, and E string passages with a fingering number above each note — 0 for open string, 1 through 4 for each finger. Separate sheets cover first and third position, plus a combined page with both.

Multi-Position Neck Overview

Once you move beyond first position, it helps to see how the positions relate on the same neck. The overview chart places third position on the left and first and second position on the right, so you can compare finger spacing without flipping between separate pages.

Fingerboard Tape Placement Guide

Many teachers use colored tape to mark common finger positions for beginners. Our tape guide shows approximate distances from the nut for a full-size (4/4) violin in first position — useful when you are setting up a smaller student's instrument or checking your own tape placement.

Who It's For

A Violin Finger Chart for Beginners — and Beyond

Different players need different views of the same information. A beginner violin finger chart that shows the neck makes sense when you are still building muscle memory. A staff-based violin fingering chart makes more sense once you are reading simple pieces and need to mark fingerings in the score. We offer both, plus intermediate material for third position.

Self-Taught Players and Students

  • Check a note name on the neck before your next practice session
  • Print a staff chart and pencil in fingerings for a piece you are learning
  • Use the tape guide when setting up a rental or fractional-size violin
  • Keep a PDF on your tablet instead of buying a laminated poster

Teachers and Parents

  • Hand out a finger chart for violin students to take home after the first lesson
  • Project the preview on a screen during class without hunting for a physical poster
  • Download a clean PDF handout that matches what students see in the online preview
  • Share the multi-position overview when a student is ready to discuss second and third position
Getting Started

How to Read a Violin Fingering Chart

Charts only help if you know what you are looking at. Here is a quick guide to reading ours — whether you prefer the neck view or the staff view.

1

Pick the Right Chart for Your Level

Start with the first position fingerboard diagram if you are new to the instrument. Move to the staff charts when you are working from sheet music and need to write fingerings above the notes. Use the third position sheets once your teacher introduces shifting — or when you are curious about notes higher up the neck.

2

Understand the Finger Numbers

On our charts, 0 means an open string — no finger down. Numbers 1 through 4 refer to index, middle, ring, and pinky fingers in order. On the fingerboard diagrams, teal circles mark natural notes and white circles mark sharps or flats. On the staff charts, the colored number above each note tells you which finger to use.

3

Preview, Then Download

Click any chart card to open a full-size preview. What you see in the preview is exactly what you get in the download — same layout, same labels, same proportions. When you are satisfied, use Download PDF for a print-ready A4 file or Download Image for a PNG you can drop into notes or a tablet.

4

Print and Keep It Handy

Most students benefit from having one neck chart and one staff chart within arm's reach. Tape the fingerboard diagram inside your case lid or clip the staff chart to your music stand. Re-download anytime — the files are free and the preview is always available if you need a fresh copy.

What Makes These Different

Why Download a Finger Chart for Violin Practice?

Preview Matches the Download

Plenty of sites offer static images that look fine on screen but print badly, or PDFs that look nothing like the thumbnail. Here, the preview and the exported file are the same document. You can check readability, note names, and layout before committing ink to paper.

Free PDF — No Account Required

Every chart downloads as a free PDF formatted for A4 paper. No subscription, no email gate, no watermark. Print one copy or twenty for a studio — the files are yours to keep.

PNG Export for Digital Use

Prefer a digital reference? Download a PNG image instead. Useful for annotating on a tablet, dropping into a lesson plan, or sharing with a parent who wants a copy on their phone.

Seven Charts, One Place

Instead of hunting across different websites for a first position diagram, a third position staff chart, and a tape guide, everything lives here. Fingerboard views, staff notation, a multi-position overview, and a combined 1st + 3rd staff page — all using the same G–D–A–E standard tuning.

Built for Real Practice

The diagrams include enharmonic spellings where they matter, clear string labels, and finger brackets that show which notes fall under each finger group. These are working reference sheets, not decorative posters.

Works Alongside Our Tuner

Pair these charts with our free online violin tuner when you are checking intonation. Tune to standard pitch, then use the fingerboard chart to confirm you are landing on the right note — especially useful in the first few months of playing.

Common Questions

Questions About Violin Finger Charts

Q1.What is the difference between a fingerboard chart and a staff chart?

A fingerboard chart shows the neck of the violin from the player's perspective — strings running vertically with note names at each finger position. A staff chart shows the same notes on the treble clef with fingering numbers written above them. Beginners often prefer the neck view because it matches what they see when they look down. Readers who already know basic notation tend to prefer the staff view.

Q2.Which chart should I start with as a complete beginner?

Start with the first position fingerboard diagram. It covers the notes you will play in your first months of study. Add the first position staff chart once you begin reading simple pieces. The tape guide is optional but helpful if your teacher uses fingerboard tape or if you are setting up an instrument on your own.

Q3.Do these charts cover all positions on the violin?

No — and that is intentional. These sheets focus on first and third position, which is where most beginners and intermediate players spend the majority of their time. The multi-position overview also shows second position alongside first and third. Higher positions are a separate study and are not included here.

Q4.Are the downloads really free?

Yes. Click any chart to preview it, then download a PDF or PNG at no cost. There is no sign-up and no limit on how many times you can download. The preview shows you exactly what the file will contain.

Q5.Can I use these charts for a fractional-size violin (1/2, 3/4)?

The note names and finger numbers are the same regardless of instrument size. The tape placement guide, however, is measured for a full-size (4/4) violin — if you have a smaller instrument, ask your teacher for adjusted tape positions rather than copying the distances exactly.

Q6.What tuning do these charts assume?

Standard G–D–A–E tuning with A at 440 Hz — the same tuning used by our online violin tuner. If your ensemble tunes to a different reference pitch, the note names stay the same; only your intonation relative to the group changes.

Keep a Violin Notes Chart Within Reach

A good reference sheet earns its place on your stand. Whether you call it a violin finger chart, a violin fingering chart, or simply a finger chart for violin practice, the goal is the same: spend less time guessing and more time playing in tune. Our set covers the views most players actually need — neck diagrams for spatial learners, staff notation for readers, and a combined page when you want both positions on one sheet.

Open any chart above to preview it at full size, then download a free PDF or PNG whenever you need a copy. Print one for your case, one for your stand, and one for your teacher — they are free, they match the preview, and they are here whenever you need a fresh printout.

violin finger chart
beginner violin finger chart
violin fingering chart
printable PDF
first position

Legal Information

Terms of service, privacy policy, and information about our service